Ryzen

After Lausitzring

I ordered a new motherboard, an AMD Ryzen 6-Core CUP with 16 GB DDR-4 RAM and a Macho Rev. 2b Cooler on Thursday, May 18th 2017. Paid by cash in advance, because mindfactory didn’t offer payment by credit card. Anyway, a colleague of mine ordered a gaming computer there before, so prepayment was no problem. The shipment arrived on Saturday, the 20th, when I was at the Lausitzring. Because we left early, I got the package from my neighbor Sunday evening.

Unpacking

Craptastic. The biggest box in the parcel was the Macho CPU-Cooler! It’s so big that I can’t even close the lid on my casing. Was quite a challenge to assemble. It looks like this:

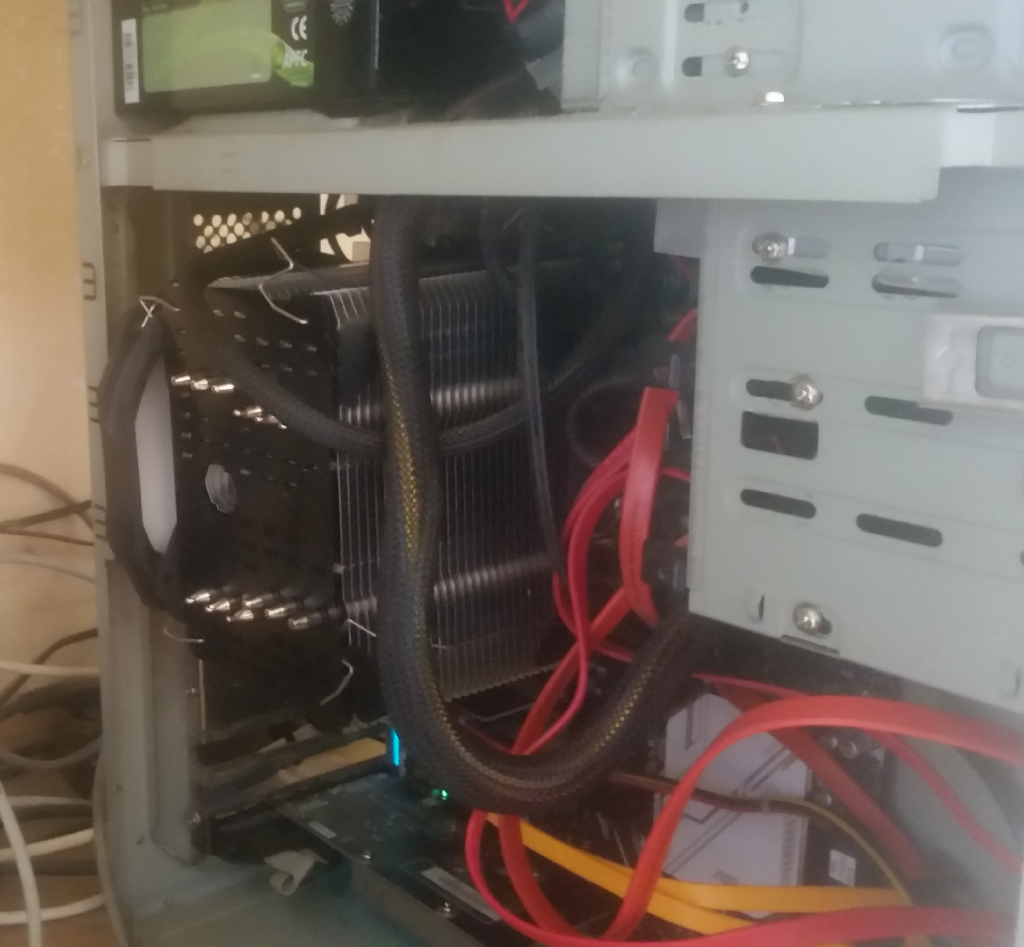
The heat sink is the big thing in the middle, the turning fan is the white thing to the leftmost. My bedside cabinet was easier to put together!

With the ASUS-AM4-Board you don’t have to remove the backplate. Actually, you can’t. The spacers fit into the threads if you remove the brackets (barely). The heat sink still slides when you fasten the screws, but fortunately it doesn’t really matter.

I benchmarked the whole thing by re-encoding several videos from 1080p to 720p with ffmpeg, threaded. The temp didn’t raise over 65 °C, and it’s blazing fast. My old 6 core did it in real time, now it’s about half the time. At least ffmpeg says so…

Loudness

At first I thought it would be a problem that I couldn’t close the lid, but it isn’t. Actually, the external RAID with 4 hard discs is louder than the CPU fan on full speed. Good thing I orderd the separate cooler. I thought they’d deliver the CPU boxed, with one, but as it turns out, they didn’t.

First Boot

Well, after stuffing everything into the small casing, I pushed the power button and… Nothing! Fortunately I quickly remembered that I forgot to connect the whole Shebang, HDD-Led, power button, speaker and such to the panel. So, disconnect everything (VGA, USB, Network), get it out from under the table and fix it. Next try: One short beep, three long ones, no picture on either display. Shit!

The manual says that it means a missing graphics card. There definitely is one, but maybe in the wrong slot. I now have 3 PCI-Express slots. The first one isn’t usable, because it’s covered by the giant heat sink. So I get under the table and place the NVIDIA-Card into the downmost slot.

That did it! I’m greeted by an UEFI-BIOS and press DEL instantly. Not much to do in there, besides turning on SVM (Virtualization). I managed to get all 3 network cables right the first time, so I have network! The external SATA-casing is no problem, either, instantly recognized. Perfect!

htop shows 12 CPUs, 6 real cores, and 6 Hyperthreading. No fiddling around with UEFI-shit. Grub loads the kernel, as it shoud. Share and enjoy!

KGlobalAccel

This definitely merits a post. While working on my Qt Audio Player (BeetPlayer), I wanted control it via the Media Keys of my Keyboard. Since I’m using KDE on Linux, I quickly found out about KGlobalAccel.

Unfortunately, there’s no decent documentation available. The API docs are kinda useless, and there’s no tutorial available, at least not with my Google foo, so here is how it works:

First and foremost, set QObject::objectName() for the QAction you want to register. It should be unique!

Don’t forget to change your CMake file or your .pro-File if you’re using qmake.

Then register a shortcut with KGlobalAccel::self()->setShortcut() like this:

QAction *muteA = new QAction(QIcon(":/mute.png"), tr("Mute"), this); 
muteA->setObjectName("beetPlayerMute"); 
connect(muteA, SIGNAL(triggered(bool)), this, SLOT(mute(bool))); 
KGlobalAccel::self()->setShortcut(muteA, QList<QKeySequence>() << QKeySequence(Qt::Key_VolumeMute), KGlobalAccel
::Autoloading);

After that launch KDE System Settings->Shortcuts->Global Shortcuts. There should be an entry for your Application. Select it and set the shortcut. Haven’t figured out how a default shortcut, but it doesn’t really matter when it shows up there.

Printing troubles

In a painful, tedious quest to make my OKI B431dn actually print from a Windows VM I learned several things:

  1. First and foremost: It really, really helps if your printer doesn’t share the IPv4 address with your TV (even if it’s turned off!)
  2. Thinking that you can get the IPv6-stacks on embedded devices such as said printer to work is just wishful thinking
  3. That I (fortunately) didn’t set an admin password for my printer
  4. That my SAMSUNG TV is still online even on standby

To elaborate: My quest started, because I wanted my Windows 10 VM to print. Easy enough, you’d think, but nothing is as easy as it seems 🙁

Adventure Levels:
  1. Fight with cups and Windows and encryption (http vs. https). That was a red herring.
  2. Fight with Samba, shared printers and Windows: another red herring
  3. Fight with different drivers or PPDs
  4. Find out that printing via localhost cups is also painstakingly slow
  5. Eventually figure out that the printer shares the IP with my TV
Solution:
  • Change the IPv4-adress of the printer, turn off IPv6 and only use the (now unique) IPv4-adress.
  • Use the URLs provided by the printer web page
Remarks:

Still don’t know why printing via IPv6 didn’t work as it should, because the printer’s IPv6-address was pretty unique, but what do I know… Anyway, after applying the solution using the generic cups postscript driver and the installed windows postscript driver, printing started after seconds instead of minutes, so problem solved 🙂

Musicbrainz – Using picard

Picard, available here or maybe in the repository of your linux distribution (Arch Linux has it), is a great tool to tag your mp3-collection (if you don’t use beets), but it’s not very intuitive, so here are the instructions.

Click “Add Folder” to add a folder, oder “Add Files” to add single files. Most of the time they’ll show up under “Unmatched Files” on the left. Then select “Unmatched files” and click the button “Lookup”. Now Picard contacts musicbrainz.org and searches for the album.

After a while you should see the album name on the right pane. If you get an error that it couldn’t load the album information, fret not. Just hit CTRL-R until the error is gone.

Expand the album information. Now drag and drop the filenames from the left pane to their respective tracks on the right. Yes, there’s no other way to match the files! Once you’re done, click “Save” to tag.

If you want Picard to move and/or rename the files according to their track title and number, check Options -> Move Files and Options -> Rename Files. Select a destination folder in Options -> Options… -> File Naming, and a pattern in “Name files like this”.

The pattern controls how the files are named. I like this one for USB-Sticks (all in one line):

%albumartist% - %album%/$if($gt(%totaldiscs%,1),%discnumber%$num(%tracknumber%,2) - %title%, $num(%tracknumber%,2) - %title%)

Guess what it means 🙂

Agents, systemd and More

How to start {gpg,ssh}-agent with systemd

To get rid of the convoluted and error prone start_agent function in .bashrc, just start ssh-agent and gpg-agent as user service with systemd. A big, fat warning before: Don’t even try to use gpg-agent as a replacement for ssh-agent! It’s so buggy that it won’t work!

To start the agents as user service, you have to create the following services in $HOME/.config/systemd/user (create the directory if it doesn’t exist):

gpg-agent.service:

[Unit]
Description=GnuPG private key agent
IgnoreOnIsolate=true

[Service]
Type=forking
ExecStart=/usr/bin/gpg-agent --daemon
Restart=on-abort

[Install]
WantedBy=default.target

ssh-agent.service:

[Unit]
Description=SSH key agent

[Service]
Type=forking
Environment=SSH_AUTH_SOCK=%t/ssh-agent.socket
ExecStart=/usr/bin/ssh-agent -a $SSH_AUTH_SOCK

[Install]
WantedBy=default.target

Then enable them:

$ systemctl --user enable gpg-agent.service
$ systemctl --user enable ssh-agent.service

Now add

export SSH_AUTH_SOCK="${XDG_RUNTIME_DIR}/ssh-agent.socket"

to your .bashrc, .profile or whatever and re-login. If the agents linger (i. e. aren’t restarted), add the following entry in /etc/systemd/logind.conf:

KillUserProcesses=yes

and restart systemd-logind. This kills all processes started on login, including kdeinit4 and stuff. Warning: This may kill your current X-Session!

Now you have to ssh-add your key every time you log out, but you don’t have to kill all the KDE-cruft any more. There always is a tradeoff 🙂

SDDM and keyboard layouts

Creating a config snippet with localectl doesn’t work, but lo and behold, there’s a workaround. Just add

setxkbmap de,us nodeadkeys

to /usr/share/sddm/scripts/Xsetup

To change the X-Server layout, create a xorg.conf that does it right.

Restore KDE-Session

Well, that’s a problem. Most KDE-Apps remember their position, even their screen, but chromium does not. The closest thing to get it right:

  1. Go to System Settings -> Startup and Shutdown -> Desktop Session and set it to “Restore manually saved session”
  2. Place your programs and windows
  3. Save session
  4. Go to Startup and Shutdown -> Autostart and add chromium as command. Then edit Properties… -> Application and change the command to:
 chromium --disable-session-crashed-bubble --restore-last-session

This restores the last session without telling you that chromium crashed. Unfortunately, all windows appear on the current desktop, so you have to move them manually. AFAICT they keep their position, so defining keyboard shortcuts to move windows to another desktop, e. g. Meta-2 for desktop 2, makes this easy.


Context Menu Entry (Windows)

  1. Find the extension you want to add an entry for in \HKEY_CLASSES_ROOT. For a Matroska-Container that’s \HKEY_CLASSES_ROOT\.mkv. The (Default)-Entry is a Pointer to where all the fun happens.
  2. Find the (Default)-Entry in \HKEY_CLASSES_ROOT (\HKEY_CLASSES_ROOT\VLC.mkv if VLC is installed)
  3. Select the “shell”-Entry and add a new Key. The name is the context menu entry
  4. Add a new Key named “command” and select it
  5. Edit the (Default)-Entry and point it to your Script/Program/whatever. For a Powershell-Script this would be e.g.: PowerShell “c:\Users\am\bin\replace-ws.ps1 -File \”%1\””

Restart KDE

When plasmashell crashes, restart it like this without logging out:

$ kquitapp plasmashell ; sleep 3 ; plasmashell --shut-up &

If that doesn’t work, kill the process plasmashell with SIGKILL.

If KWin doesn’t work any more, restart it with:

$ kwin_x11 --replace 2>&1 > /dev/null &


Back to KDE

What happened?

Some things were just too annoying with awesome:

  • cvlc -f not opening full screen, just sometimes, completely at random. When  it didn’t, it froze.  When it did, it slowed down everything. First I thought that it had  something to do with VDPAU  and tried to turn it off, but I didn’t even get that far.
  • Maximizing a youtube-video in Chromium seemed to freeze the screen. Eventually I figured out that awesome decided to open it in the background or something. Surprisingly, maximizing the window in that state raised it. Learned that by accident.
  • ffplay and mplayer windows centered right where they shouldn’t: between both screens.

Overall, a tiling window manager is nice when  you use X just as a console multiplexer, but if you want more, the disadvantages outweigh the advantages.

So I decided to give KDE another shot. I used it before, but eventually got annoyed by all the useless crap I don’t want nor need, like Akonadi or Nepomuk.

The Experience

So I replaced

exec awesome

with

exec startkde

in my .xinitrc. First thing I noticed was my CPU fan spinning up. Baloo_file decided to have my 6 CPUs work overtime. I found out that it is the new file indexer of the KDE framework. Don’t want it, don’t need it, but easily fixed. Just turn  off the Desktop Search in System Settings. For good measure I also added

chmod -x /usr/bin/baloo_file

Other than that I’m quite happy with it. cvlc -f  always starts full screen again, and a tabbed Konsole is so much nicer than a tiled urxvt 🙂 Chromium and youtube also work as  expected again.

What I miss

What I really miss is separate desktops per screen, but from what I read that won’t be implemented soon, if ever. Well, you can’t have everything. Fortunately I found workarounds for most cases.


Change DirColors (literally)

1. Export the database to a file, say .config/dircolors:

$ dircolors -p > .config/dircolors

2. Customize it, eg. change directories to cyan:

...
DIR 01;36 # directory
...

3. Include it into .bashrc. Add this somewhere at the top:

eval $(dircolors .config/dircolors)

4. ANSI color codes

Ansi Color codes can be found here