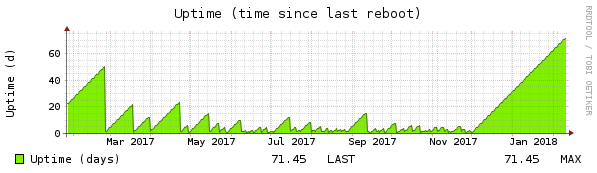
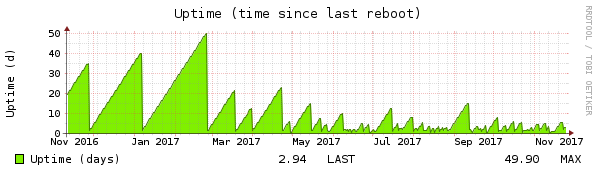
Valhalla NIC

As it seems, the NIC in current valhalla has a hardware bug, causing hardware unit hangs. To work around this, disable scatter-gather, TCP segmentation offloading and generic receive offload with this command:

# ethtool -K wan sg off tso off gro off

I did that 11 days ago, and didn’t get a single unit hang yet. Keep your fingers crossed!

Dusting off the Array! (Part 9)

Shit happens!

What shit happened? Well, of course the SSD-Raid failed, too. Spontaneous massive existence failure. All non-backed-up data lost. Mostly because RAID5 makes things harder to recover data, so I decided to scrap the software raid and go with single disks. Just the device mapper for encryption and one big logical volume per disk.

That went well for quite some time. An occasional SATA error once in a while, but nothing to worry about. Or so I thought… I could even zero out the unused disks with dd without getting errors. But recently (Oct. 31, 2018) even the single disk failed. No SATA errors, just a stalled rsync to a zeroed out disk. That made me suspicious. The Crucial SSD’s couldn’t be that bad!

So I decided to change the bus from eSATA to USB. I tried that before, but not with the new external casing. The old one crashed hard when I tried to sync the RAID, so I didn’t think it was an option. But with single drives and a new casing I gave it another try.

What can I say? I guess it was a faulty cable or something. With USB it works perfectly fine! 4 days and running, not a single error. Throughput is as good as SATA, so I’m keeping my fingers crossed! I really hope that this is the end of this story…

RTL

Hätte ja nie gedacht, dass ich mal etwas über den Harz4-Sender RTL schreiben würde, aber da läuft halt Formel 1. Deshalb aus gegebenem Anlass: Der automatische Sendersuchlauf meines TV-Trümmers findet RTL nicht. Deshalb manuell suchen, und zwar bei 122000KHz, 64QAM, 6900 KSyms, gefunden hier.

Archlinux and an AMD-GPU

I finally decided to get rid of my ancient nvidia graphic board and bought a Sapphire Radeon R5 230 with 2GB RAM for 46,40 €uros. The vendor chose GLS as delivery service, so no tracking number. Of course it didn’t arrive at the announced day. I had to ask the vendor and eventually picked it up in a not so close boutique.

Well, once I had it, assembly wasn’t much of a problem. Configuring X was. Took me five hours to get it right!

First, I had to figure out which driver to use, which isn’t as easy as it seems. Turns out to be radeon, not amdgpu. Without any configuration the radeon kernel module is loaded, which is right, by the way, but X can’t figure out what driver to use. By default it uses amdgpu if installed. Well, wrong choice.

Create a configuration with

# X -configure

and change the Driver from amdgpu to radeon. Then remove the vnc module in Section “Module” and the Screens in Section “ServerLayout”. X identifies 2 Devices, one for VGA output, and one for DVI, or so I thought. Actually, the card has another output: HDMI for TV-out, which happens to be the default. Very clever! Disable it by adding this to the kernel command line:

video=HDMI-A-1:d

Now set the option ZaphodHeads to “VGA-0,DVI-0” in both device Sections. That should get you up and running. SDDM still doesn’t work, but startx will. SDDM requires some xrandr magic in Xsetup, which I haven’t figured out yet.

Anyway, it was worth it! No more annoying delays when playing videos while writing text in LibreOffice! In total the system feels much faster now.

You can marvel at the whole config here.

Hardware accelerated transcode

While reading the Linux Magazine on the bowl this morning, I discovered that ffmpeg has hardware support for decoding and encoding. Since I do that quite often, I figured it’s time to try it out. Lo and behold, it works better than I expected! Not on hadante, though. ffmpeg just segfaulted, because the card is way too old and the kernel module doesn’t seem to support it.

On othalla (my almost 4 year old laptop), it works like a charm. ffmpeg said encoding  at 5.5 times the original speed, even over NFS!

The command line I used:

$ ffmpeg -hwaccel cuvid -c:v h264_cuvid -resize 1280x720\
-i in.mkv -acodec copy -scodec copy\
-c:v h264_nvenc -preset slow -b:v 4000K -minrate 4000K out.mkv

It has a NVIDIA GPU, as well as an Intel pixel manager, but cuvid and nvenc only works the (proprietary) NVIDIA driver. Anyhow, as always it’s important where you place the options. Any options before -i is for decoding, anything after is for encoding. This makes:

-hwaccel cuvid -c:v h264_cuvid -resize 1280x720

ffmpeg decode everything via cuvid on the GPU and resize it to 720p. Source was 1080p.

-acodec copy -scodec copy

says: Just copy the audio stream and the subtitle stream to output. Now comes the important:

-c:v h264_nvenc -preset slow -b:v 4000K -minrate 4000K

tells it to let the GPU encode it to x264, preset slow and a minimum bitrate of 4000K. If I do the same via software decoder and encoder, I get barely more than real time speed, perhaps 1.1 or 1.2, depending on the source. With cuvid I get 5.5. Even Hadante with its 12 processors and 32GB only gets a speed of 2.0 to 2.2 max, and it’s hardware is much more current! Like it!

Ryzen, Part 5

Well, well, well, after 71 days uptime the system can be considered stable:

Disabling the C6-sleep-state did it:

zenstates.py --c6-disable

Since last reboot the spectre/meltdown disaster happened. DKMS didn’t work any more, because archlinux updated gcc to 7.3 with retpoline support, so it blatantly refused to compile the nvidia module with a different compiler than the kernel was compiled with. That wasn’t really a problem, because X still restarted properly.

But there were other problems like systemd asking for passwords when it shouldn’t, dbus out of date and so on. Well, that’s what you get when running a rolling distribution. So I thought it was time to schedule a kernel re-compile and a reboot.

The re-compile was harder than expected. To put it short:

  • When following the official documentation, do the checkout in an empty directory
  • edit prepare() to do make oldconfig and make menuconfig in this order
  • Don’t forget to uncomment and change pkgbase to linux-ryzen!
  • Don’t makpkg -s on an encrypted volume 🙂
  • If DKMS complains about a compiler mismatch on pacman -U, do IGNORE_CC_MISMATCH=1 pacman -U …

After a successful reboot I decided to install the fallow 16 GB of ram I initially purchased, since RAM timings weren’t really the problem. Now I have a workstation with whopping 32GB RAM:

# free -m 
       total        used        free...
Mem:   32167        5521        8478...
Swap:  16382           0       16382

I kept the RCU_* setting, so let’s see how it turns out. Keeping fingers crossed!

The whole SheBang!

Ryzen, Part 4

Take 4

Well, I didn’t have to wait long. The box crashed right under my fingers only hours after the last changes. So, instead of enabling “Global C-States” in the BIOS, I disabled it explicitly.

Additionally, I used zenstates.py to disable C6 for good, hopefully:

# modprobe msr
# ./zenstates.py --c6-disable 
Disabling C6 state
# ./zenstates.py -l 
P0 - Enabled [...]
P1 - Enabled [...]
P2 - Enabled [...]
P3 - Disabled 
P4 - Disabled 
P5 - Disabled 
P6 - Disabled 
P7 - Disabled 
C6 State - Package - Disabled 
C6 State - Core - Disabled

As suggested here, I also disabled ASLR:

# echo 0 > /proc/sys/kernel/randomize_va_space

Changes so far:

  • Buy new Memory:  16GB G.Skill Flare X schwarz DDR4-3200 DIMM CL14 Dual Kit instead of 16GB Corsair Vengeance LPX schwarz DDR4-3000 DIMM CL15 Dual Kit.  Didn’t help at all, since it’s not a memory timing problem, but a linux problem. About 200€ wasted, yay! The bright side: If the other changes make my system stable, I could install the other 16GB, too. That would be a whopping 32GB for a desktop system 🙂
  • Various BIOS updates.
  • Play with D.O.C.P. settings. Didn’t help, see above.
  • Find out that linux doesn’t like AMD Ryzen processors and build a custom kernel with RCU_NOCB_CPU enabled. Still crashes 🙁
  • Disable C6 with zenstates.py (see above)
  • Disable ASLR (also see above)

Keeping my fingers crossed. If all this doesn’t help, my last option would be to change to Intel. I don’t expect much from my system, just that it runs stable. Very disappointing that AMD can’t get it right…

The whole SheBang!

Ryzen, Part 3

Take 3

Of course neither the new memory nor the BIOS update fixed the random crashes, but fortunately I’ve got another hint: Maybe it’s a linux-specific problem, and not one with memory timing. This post suggests that it’s a problem with C-States and RCU. Adding the following kernel command line parameters should help:

processor.max_cstate=1
rcu_nocbs=0-11

As always, nothing is as simple as it seems 🙁

The C-States

For max_cstate to take effect, I had to actually enable Global C-State-Control in the UEFI-thingy of my mobo! The default was Auto, which in turn defaulted to Disabled. After enabling it, dmesg reported this:

ACPI: ACPI: processor limited to max C-state 1

Before that, there was no mentioning of C-states in the kernel log, so I doubt that it has any impact, but one should never give up hope!

The RCU-Thingy

What it is (quoting Paul E. McKenney from LKML):

Read-copy update (RCU) is a synchronization mechanism that was added to the Linux kernel in October of 2002. RCU achieves scalability improvements by allowing reads to occur concurrently with updates.

It’s much more likely to be the cause of the problem since I once saw something like this after a reboot on the console:

NMI watchdog: BUG: soft lockup - CPU#12 stuck for 23s! [DOM Worker:1364]

The process was “systemd” instead of “DOM Worker”, but that shouldn’t matter. Anyway, the parameter rcu_nocbs=0-11 has no effect if the kernel config option CONFIG_RCU_NOCB_CPU is not set. Guess what, in the stock archlinux kernel it’s unset, lucky me!

So I ventured out to compile a custom kernel for arch. That turned out to be disappointingly easy! The available documentation just works ™! Four hints, though:

  1. Uncomment “make menuconfig”
  2. Edit /etc/makepkg.conf and set MAKEFLAGS to “-j<no-processors+1>” to get parallel builds
  3. If you have a nvidia graphics card and use the proprietary driver, keep in mind that you have to rebuild that one, too. Once again, that was ridiculously easy. Just install nvidia-dkms before updating the kernel with pacman -U and it will be built automagically when you install the new kernel! Detailed instructions are here.
  4. Don’t forget to update your grub-config with grub-mkconfig before rebooting!
Offload RCU callbacks from CPUs: 0-11.

should be in dmesg after a reboot, otherwise it didn’t work. I’m waiting with baited breath how it turns out!

Previous parts of my adventure: Part 1, Part 2.

Ryzen, Part 2

Introduction

Since the arrival of my new Ryzen system I had problems with random crashes. Seems it’s a memory timing problem, at least that’s what Google suggests. I bought a 16GB Corsair Vengeance memory kit, consisting of 2x8GB RAM bars, a suggestion from a colleague. She’s using the same ASUS-board with that memory without problems, but her box isn’t running 24/7. It’s a Win10 Gaming PC.

Take 1

First thing to do: Update the BIOS, or UEFI, as it’s called ‘nowadays. Of course that didn’t help. Also, the changelog wasn’t very helpful (“improving stability”), thanks, ASUS!

So I ventured out and and did some research on overclocking and memory timing. Turns out that Intel invented XMP (Extreme Memory Profile). Basically, it’s timing data stored on the memory bar, read and used by the BIOS/UEFI. AMD didn’t want to pay the license fee, so they called their version AMP. ASUS, the mainboard manufacturer, called its implementation of AMP D.O.C.P. (Direct Over Clock Profile).

Full of hope, I turned on D.O.C.P. It set the timing data to the suggested values from this document. It didn’t help. Guess when I bought the new gear:

The crashes have absolutely nothing to do with CPU load or temperature, quite the opposite. Mostly, they happen during the night, after backup 🙁

Take 2

“What the hell”, I figured, and bought another memory kit. This time 16GB G.Skill Flare X for only € 197,46. After that the box ran for whopping 5 days without a crash, yay! It still crashed, though. This time I didn’t have X running and saw a kernel message that PID 1 (systemd) was stuck: “Soft lockup: CPU#3 stuck for 23s” (or similar). As always, I could only recover the box by hardware reset.

Take 2.5

So today (2017/11/24) I updated to the latest BIOS/UEFI (PRIME-X370-PRO-ASUS-3203.CAP) and down-clocked the memory to 2199 or 2133Mhz, don’t remember the exact number. Let’s see how that turns out!

[To be (dis)-continued…]

Dusting off the Array! (Part 6)

Well, well, well! Here we are again. What shall I say? The plan worked almost as expected. As it turned out it was enough to use the spare HGST 4TB drive and a spare USB 3.0 2TB drive joined in a volume group to copy the remaining data.

The RAID resync was interrupted because a 2nd drive was failing (of course a SEAGATE 3TB). The failing sectors were mostly on the obnam LV, so not a big problem regarding the data, but unfortunately there’s no way to skip that LV or the files, because RAID is at the lowest level and only knows about sectors.

So I completely rebuilt the raid with the 1 remaining free HGST drive and the 3 new ones, everything fly by wire. With 4 working drives the rebuild went ahead with about 33MB/sec, as it should. After 2 days the rebuild and copying the data back was finally done. I lost my obnam backup and a few pics and movies from “movs”, but that’s about it. So I guess one could say that I got away with a slap on the wrist!

In the meantime I’ve had it with the EasyRAID SATA enclosure. There were 2 major drawbacks:

  1. It shuts down when idle, with a timeout too short to survive a reboot. Very nasty!
  2. Even if it’s turned on during POST, sometimes not all drives spun up in time or at all, so it always took several attempts to re-assemble the raid. Dunno if it is because of old age or if it’s a design flaw.

So I looked for another solution and went for an ORINOCO 4Bay USB3.0 and eSATA hard disk docking station. It’s hot-pluggable and has all the bells and whistles. From what I can tell for now, it was a good choice. It has an on/off button, but no timeout, so no more boots without the Array. Yay!

At first it didn’t seem to work at all, but only because I connected the wrong eSATA cable (that one which was dangling free behind hadante). Stupid me! Once I connected the right cable, everything went smoothly.

One more thing: The serial number reported by smartctl is not printed anywhere on the drive label 🙁 Fortunately I found the spare drive on the first attempt! Such things don’t happen often…

And now: This is how it looks like after cleaning up:

Neat, isn’t it? It’s a bit louder without a closed casing, but that’s not necessarily a bad thing ™.