Mail from systemd-timers

If you want to mail the output of a systemd-timer unit by redirecting STDOUT to /usr/bin/mail or something: forget it. For a long time SysAdmin used to good old crond it definitely doesn’t work as expected. As long as you redirect STDOUT in your script or program, you won’t get any output, because systemd redirects STDOUT to the journal by default. It’s documented behavior, you just have to read the fine print in man systemd.exec (StandardOutput=).

It’s rather counter-intuitive and has been discussed on systemd-devel, but in the end it’s “the right thing” ® to do. Systemd PID 1 should not care nor can it know where STDOUT is currently connected to.

So, how to work around it? Most likely your timer-thingy is a script wrapped in a service unit with Type=oneshot and ExecStart=/my/script. If so, just create a helper script that mails the output of journalctl -u <unit> –since today or something. Just don’t read the output of journalctl via a pipe!

My solution is a little perl script: mail-unit.pl

Just add StartExec=mail-unit.pl <my unit name> after your actual script.

Restore files from obnam

Well, well, well… Seems I just fucked up:

  1.  I should have remembered that tc can only control outoging traffic. So changing /etc/network-scripts/tc.sh for incoming rates was just stupid.
  2. I wrote the file to disk without keeping the original, working lines commented out.
  3. I didn’t remember the proper bandwidth values.

Fortunately, I keep an obnam-backup. To recover files from e.g. /etc, do the following:

# mount /dev/mapper/obnam-c /mnt/backup-obnam/
# obnam restore --to=/tmp/restore\
 --config=/home/am/.config/obnam/etc.conf

That restores all of /etc to /tmp/restore. Add a file or directory the end to only restore that file or directory, or leave out –to to restore in place.

Do not forget to umount /mnt/backup-obnam afterwards!

Another thing: If obnam complains about locking errors, do the following:

# mount /dev/mapper/obnam-c /mnt/backup-obnam/
# cd .config/obnam
# for i in *.conf ; do obnam force-lock --config $i ; echo $i ; done

Shit gebeurt 🙁

Splitting big mp3 files

When splitting big mp3 files (like audiobooks) into digestible chunks (say 20 minutes) with ffmpeg, there are several things to keep in mind:

  1. It really, really matters where you put the -ss option on the command line! If you use it as an output option (i.e. after -i), input is read but discarded, so you end up with a file containing silence at the start. You have to use it as an input option (i.e. before -i) to get the proper result.
  2. Same goes for -t, only that you have to use this one as an output option (i.e. after -i but before the output file name. Also note that -t denotes a duration, not a position!
  3. If you want to transfer the split files to an Android device, you need to adjust the IDv3-tag “title”. Android uses that plus the original extension as the display file name. If the title-tag does not contain some string to differentiate files, you end up with identical file names. So you have to fix the title to something like “audiobook – 01 of 37”. Of course the track-tag is ignored (why bother with something so obvious 🙁 ).

But do not fret. I put this all together in a quick and dirty quick and dirty perl script. First argument is the input file, second the base for output file names and third the base for the title tag:

$ splitmp3.pl "Big Input file.mp3" "Output file" "Name"

outputs files like this:

Output file - 01.mp3
Output file - 02.mp3
...

with titles like this:

Name - 01 of 37
Name - 02 of 37
...

That’s all, folks!

Powershell and square brackets

Have you ever tried mass renaming files with square bracket in the path? Then I’m pretty sure you failed, because you can’t escape them easily. You have to do it manually by setting up temporary variables and replace ‘[]’ by ‘“[“]’.  It’s a nightmare. Find a box with a bash shell or install cygwin. Then simply do this:

$ for i in * ; do mv "$i" "newname $i" ; done

instead of this shit! That makes PowerShell almost useless for file operations 🙁

How to get rid of Adobe Flash

How to remove

It’s not as easy as it seems. First of all, do not use the official Uninstaller from Adobe. I don’t know what it does other than showing a reverse progress bar, but it certainly does not remove the Flash-Crap from your computer.

To remove it for good, you have to jump through several hoops:

  1. Close every program using Flash, like IE (if you’re using this piece of shit) or Firefox. AFAIK Chrome has its own plugin, but it can’t hurt to close it, too
  2. Open the Explorer and go to C:\Windows\System32. Select the Macromed-Folder and take ownership. Then grant yourself full access including all subdirectories.
  3. Delete the Folder
  4. Do the same in C:\Windows\SysWOW64.
  5. Take ownership of C:\Windows\SysWOW64\FlashPlayerApp.exe and C:\Windows\SysWOW64\FlashPlayerCPLApp.cpl, grant yourself full access and delete the files
  6. Go to %appdata% and remove the Macromedia\Flash directory
  7. Reboot (surprise!)
  8. Check that the Flash-Crap is gone from the control panel
  9. Open this link in Edge or IE to see if Flash is gone for good
  10. If you’re using Chrome, disable the plugin in about:plugins

What else can I do?

If you’re monitoring your Windows-Box with check_mk, you can use these scripts to check for Flash.

Put this into C:\Program Files (x86)\check_mk\local\check_flash.ps1 or wherever your check_mk agent is installed

$items = "C:\Windows\System32\Macromed",`
"C:\Windows\SysWOW64\Macromed",`
"C:\Windows\SysWOW64\FlashPlayerApp.exe",`
"C:\Windows\SysWOW64\FlashPlayerCPLApp.cpl"

echo "<<<flash_gordon>>>"

foreach ($i in $items){
 if(Test-Path $i){
  echo ("{0} 1" -f $i)
 }else{
  echo ("{0} 0" -f $i)
 }
}

Now put this script into ~siteuser/local/share/check_mk/checks/flash_gordon:

#!/usr/bin/python 
 
def inventory_flash_gordon(info): 
    inventory = [] 
    for line in info: 
        inventory.append((line[0], line[1])) 
 
    return inventory 
 
def check_flash_gordon(items, params, info): 
    retstring = "Good, no Flash-Crap found!" 
    found = [] 
    retval = 0 
    for line in info: 
        if int(line[1]) > 0: 
            found.append(line[0]) 
 
    if found: 
        retstring = "Crap, found %s" % ', '.join(found) 
        retval = 2 
 
    return (retval, retstring) 
 
check_info["flash_gordon"] = { 
    "check_function":   check_flash_gordon, 
    "inventory_function":       inventory_flash_gordon, 
    "service_description":      "Check for Adobe Flash Crap", 
    "has_perfdata":             False, 
}

Reinventorize. Now the host goes CRITICAL if any part of Flash is found.

[Update 2015-12-09]

I hate this crap! Windows Update decided that I need a security update for Flash, even though it isn’t installed any more. What the fuck? Of course the update fails, but in their wisdom they decided to remove the option to hide updates from the Windows 10 dialog. Now you have to use this program 🙁

Anyway, I only noticed it because of check_mk. At least now I know it works 🙂 Let’s see when this bites my ass…

[Update 2015-12-30]

What a clusterfuck! Another Windows update for flash. Thanks to check_mk I noticed it right away. Shouldn’t be too difficult to check for this crap before installing the update, right?

[Update 2016-11-10]

Finally got tired of removing this crap manually again and again! Since you can’t prevent Windows Update from installing this shit, I wrote a script to put it where it belongs. You need the Powershell Community Extensions (PSCX) for it to work. Install then, download the txt, remove the txt-Extension and replace the owner with whatever is appropriate.

Have fun!
Resync subtitles

1. Prerequesites

  • The video file
  • Subtitles (in doubt get them from Addic7ed.com)
  • aegisub (available from your favorite linux distribution)
  • my handy little script timediff.pl (WordPress thinks that perl-Scripts are dangerous, so you’ll get a text file. Copy and paste the content and make it executable)

2. Getting ready

  1. Load the subtitles: File -> Open subtitles… Select the .srt-File
  2. Load the video: Viedo -> Open video… Select the mkv-File
  3. Load audio: Audio -> Open audio from video
  4. Start timediff.pl in a Konsole-Window

Now you’re all set.

3. How to do it

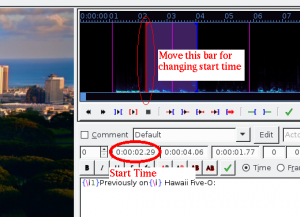
  • Select the first subtitle line on the lower bar and copy the start time into timediff.pl
  • Adjust the red bar in the top right widget to match the start:aegisub
  • Copy the new start time into timediff.pl
  • Select the next subtitle line and then Timing -> Shift Times…
  • Insert the result from timediff.pl into the Time: Field and select the direction (Forward or Backward). Then select “Selection onward”
  • Press OK
  • Check the result.
  • Search for ad breaks and repeat


Context Menu Entry (Windows)

  1. Find the extension you want to add an entry for in \HKEY_CLASSES_ROOT. For a Matroska-Container that’s \HKEY_CLASSES_ROOT\.mkv. The (Default)-Entry is a Pointer to where all the fun happens.
  2. Find the (Default)-Entry in \HKEY_CLASSES_ROOT (\HKEY_CLASSES_ROOT\VLC.mkv if VLC is installed)
  3. Select the “shell”-Entry and add a new Key. The name is the context menu entry
  4. Add a new Key named “command” and select it
  5. Edit the (Default)-Entry and point it to your Script/Program/whatever. For a Powershell-Script this would be e.g.: PowerShell “c:\Users\am\bin\replace-ws.ps1 -File \”%1\””

Unbrick Yoga tablet

Since my Lenovo Yoga tablet (10″, dunno the model number any more) has a tendency to turn itself into a expensive paper weight after updates, here’s the procedure to unbrick it:

  1. Get a physical Windows 7 PC. Windows > 7 will not do, since it recognizes the tablet and installs the wrong device drivers! You really need Windows 7!
  2. Get the image file and the device drivers. A working image with the file name Yoga_tablet_10_A422_000_040_131023_WW_WIFI.rar is available on tollana or at http://www.lenovo-forums.ru. The driver filename is SP_Flash_Tool_Driver_Auto_Installer_v1.1236.00.7z, btw.
  3. Start the tablet in rescue mode. Press Vol+Down (that is the upper part of the volume switch if it’s standing on the foot) and the power button simultaneously until some Chinese Characters appear and plug it in. You should get unknown devices in the Windows Device Manager.
  4. Install the drivers and don’t be afraid about the warnings and unplug the device once it’s done.
  5. Unpack the firmware image and start the included SP Flash Tool. Under “Options” turn the USB Mode on if applicable.
  6. “Scatter Load” the file “Yoga_tablet_10_A422_000_040_131023_WW_WIFI/target_bin/target_bi
    n/MT6589_Android_scatter_emmc.txt” and wait until Flash Tool is done, showing “Searching” in the lower toolbar.
  7. Click “Download” and ignore the warning.
  8. Select the menu entry containing “eMMC” on the tablet.
  9. Only now plug it back in, wait for Flash Tool to recognize it and download the firmware.
  10. Once Flash Tool is done, unplug the tablet, restart it and wait for the installation to finish.
  11. Install several updates and reconfigure it.

Don’t share, but enjoy!