Ryzen, Part 5

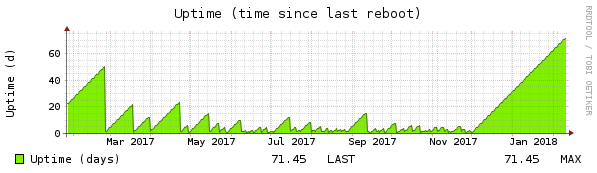
Well, well, well, after 71 days uptime the system can be considered stable:

Disabling the C6-sleep-state did it:

zenstates.py --c6-disable

Since last reboot the spectre/meltdown disaster happened. DKMS didn’t work any more, because archlinux updated gcc to 7.3 with retpoline support, so it blatantly refused to compile the nvidia module with a different compiler than the kernel was compiled with. That wasn’t really a problem, because X still restarted properly.

But there were other problems like systemd asking for passwords when it shouldn’t, dbus out of date and so on. Well, that’s what you get when running a rolling distribution. So I thought it was time to schedule a kernel re-compile and a reboot.

The re-compile was harder than expected. To put it short:

  • When following the official documentation, do the checkout in an empty directory
  • edit prepare() to do make oldconfig and make menuconfig in this order
  • Don’t forget to uncomment and change pkgbase to linux-ryzen!
  • Don’t makpkg -s on an encrypted volume 🙂
  • If DKMS complains about a compiler mismatch on pacman -U, do IGNORE_CC_MISMATCH=1 pacman -U …

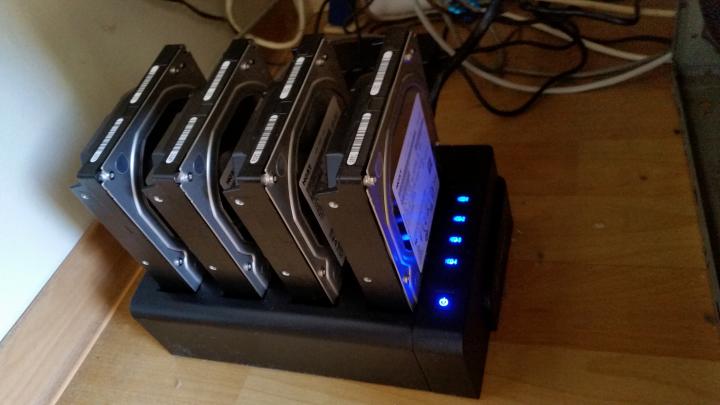
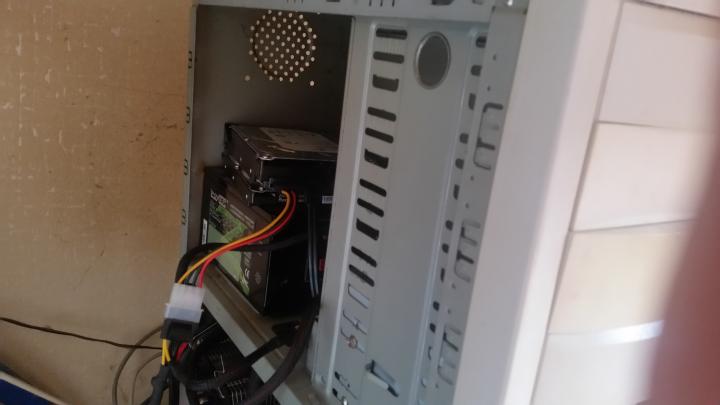
After a successful reboot I decided to install the fallow 16 GB of ram I initially purchased, since RAM timings weren’t really the problem. Now I have a workstation with whopping 32GB RAM:

# free -m 
       total        used        free...
Mem:   32167        5521        8478...
Swap:  16382           0       16382

I kept the RCU_* setting, so let’s see how it turns out. Keeping fingers crossed!

The whole SheBang!

How to create a QIcon with Qt programmatically

First, create a 32×32 QImage and make it transparent (or whatever background color you need):

QImage img(32, 32, QImage::Format_ARGB32);
img.fill(QColor(0, 0, 0, 0));

I use QImage instead of QPixmap, because the documentation says that QImage is optimized for I/O, e.g. painting, and the first attempts with QPixmap looked like crap. Next, create a QPainter for the QPaintDevice and set some render hints to make it look nice:

QPainter *p = new QPainter(&img);
p->setRenderHint(QPainter::Antialiasing);
p->setRenderHint(QPainter::TextAntialiasing);
p->setRenderHint(QPainter::SmoothPixmapTransform);

QPainter::setBrush() sets the background color for shapes, QPainter::setPen() the foreground color for text:

p->setBrush(QColor(Qt::red));
p->setPen(QColor(Qt::white));

Then select a font the size of our future Icon:

QFont f("courier new");
f.setPixelSize(32);
p->setFont(f);

Now we need some background. White on transparent isn’t really readable, so let’s draw a circle:

p->drawEllipse(img.rect());

Since our QImage is actually a square and not an rectangle, QPainter::drawEllipse will draw a circle. Print the QChar, letter, or whatever:

p->drawText(img.rect(), Qt::AlignCenter, QChar(char));

Now clean up and return the QImage as QIcon:

delete p;
return QIcon(QPixmap::fromImage(img));

The whole shebang can be marveled at here. It looks like this:

Have fun!

IPv4 to IPv6 Forwarding

Why? Imagine you have an IPv6-only VM on an IPv4 and IPv6 enabled Host, or for some reason IPv4 is routed differently on the VM than IPv6 (think VPN). Then you want to access your VM from an IPv4-only internet access point. Pretty much impossible, you’d think. But fear not! socat comes to rescue 🙂

SOcket CAT is the swiss army knife for network sockets, even when iptables can’t help you any more:

socat TCP4-LISTEN:<LPORT>,fork TCP6:[2001:db8::8]:<DPORT>

<LPORT> is the listen port on the Host. It can be anything, but if you want to run socat as a non-privileged user, it should be > 1024. <DPORT> is the destination port on the IPv6-only VM to forward <LPORT> to. Of course this is not arbitrary. The parameter fork makes socat keep listening after a connection is established. Otherwise it would exit after the connection is closed.

A systemd-unit would look like this:

[Unit]
Description=Forward Port to IPv6
Requires=sys-subsystem-net-devices-br0.device
After=sys-subsystem-net-devices-br0.device

[Service]
User=nobody
ExecStart=/usr/bin/socat TCP4-LISTEN:44444,fork TCP6:[2001:db8::8]:3389
 
[Install] 
WantedBy=multi-user.target

The Requires and After order the service after the network bridge (br0) for your VM. Change it accordingly.

If your use case would be RDP (like above), and your favorite RDP client is rdpk, you can add a Host <IPv4-Address-of-Host>:44444 to rdpk and be done! Luckily rdpk passes the Hostname verbatim to xfreerdp /v: 🙂

Ryzen, Part 4

Take 4

Well, I didn’t have to wait long. The box crashed right under my fingers only hours after the last changes. So, instead of enabling “Global C-States” in the BIOS, I disabled it explicitly.

Additionally, I used zenstates.py to disable C6 for good, hopefully:

# modprobe msr
# ./zenstates.py --c6-disable 
Disabling C6 state
# ./zenstates.py -l 
P0 - Enabled [...]
P1 - Enabled [...]
P2 - Enabled [...]
P3 - Disabled 
P4 - Disabled 
P5 - Disabled 
P6 - Disabled 
P7 - Disabled 
C6 State - Package - Disabled 
C6 State - Core - Disabled

As suggested here, I also disabled ASLR:

# echo 0 > /proc/sys/kernel/randomize_va_space

Changes so far:

  • Buy new Memory:  16GB G.Skill Flare X schwarz DDR4-3200 DIMM CL14 Dual Kit instead of 16GB Corsair Vengeance LPX schwarz DDR4-3000 DIMM CL15 Dual Kit.  Didn’t help at all, since it’s not a memory timing problem, but a linux problem. About 200€ wasted, yay! The bright side: If the other changes make my system stable, I could install the other 16GB, too. That would be a whopping 32GB for a desktop system 🙂
  • Various BIOS updates.
  • Play with D.O.C.P. settings. Didn’t help, see above.
  • Find out that linux doesn’t like AMD Ryzen processors and build a custom kernel with RCU_NOCB_CPU enabled. Still crashes 🙁
  • Disable C6 with zenstates.py (see above)
  • Disable ASLR (also see above)

Keeping my fingers crossed. If all this doesn’t help, my last option would be to change to Intel. I don’t expect much from my system, just that it runs stable. Very disappointing that AMD can’t get it right…

The whole SheBang!

Ryzen, Part 3

Take 3

Of course neither the new memory nor the BIOS update fixed the random crashes, but fortunately I’ve got another hint: Maybe it’s a linux-specific problem, and not one with memory timing. This post suggests that it’s a problem with C-States and RCU. Adding the following kernel command line parameters should help:

processor.max_cstate=1
rcu_nocbs=0-11

As always, nothing is as simple as it seems 🙁

The C-States

For max_cstate to take effect, I had to actually enable Global C-State-Control in the UEFI-thingy of my mobo! The default was Auto, which in turn defaulted to Disabled. After enabling it, dmesg reported this:

ACPI: ACPI: processor limited to max C-state 1

Before that, there was no mentioning of C-states in the kernel log, so I doubt that it has any impact, but one should never give up hope!

The RCU-Thingy

What it is (quoting Paul E. McKenney from LKML):

Read-copy update (RCU) is a synchronization mechanism that was added to the Linux kernel in October of 2002. RCU achieves scalability improvements by allowing reads to occur concurrently with updates.

It’s much more likely to be the cause of the problem since I once saw something like this after a reboot on the console:

NMI watchdog: BUG: soft lockup - CPU#12 stuck for 23s! [DOM Worker:1364]

The process was “systemd” instead of “DOM Worker”, but that shouldn’t matter. Anyway, the parameter rcu_nocbs=0-11 has no effect if the kernel config option CONFIG_RCU_NOCB_CPU is not set. Guess what, in the stock archlinux kernel it’s unset, lucky me!

So I ventured out to compile a custom kernel for arch. That turned out to be disappointingly easy! The available documentation just works ™! Four hints, though:

  1. Uncomment “make menuconfig”
  2. Edit /etc/makepkg.conf and set MAKEFLAGS to “-j<no-processors+1>” to get parallel builds
  3. If you have a nvidia graphics card and use the proprietary driver, keep in mind that you have to rebuild that one, too. Once again, that was ridiculously easy. Just install nvidia-dkms before updating the kernel with pacman -U and it will be built automagically when you install the new kernel! Detailed instructions are here.
  4. Don’t forget to update your grub-config with grub-mkconfig before rebooting!
Offload RCU callbacks from CPUs: 0-11.

should be in dmesg after a reboot, otherwise it didn’t work. I’m waiting with baited breath how it turns out!

Previous parts of my adventure: Part 1, Part 2.

libvirt snapshots

If you have a VMWare-Background, handling libvirt-snapshots is very counter-intuitive. With VMWare, you take a snapshot and make changes to the actual disk. So when you’re done and haven’t encountered any problems, you just delete the snapshot and be happy.

With libvirt it’s the other way around: You work with the snapshot! This means you have to commit the changes to the base image after making changes! If you just delete the snapshot you’re back where you started! To make things worse, there are internal and external snapshots, and the latter aren’t fully supported by libvirt, meaning you can’t delete external snapshots with virsh.

So, to “emulate” VMWare-Behavior you have to:

  • Create an external snapshot while the VM is shut down:
# snapshot-create-as <domain> <snapshot-name> --disk-only --atomic
  • start the VM again:
#  start <domain>

Don’t let you fool by the output of snapshot-list: even though it says that the domain is shutoff, you’re actually working with the snapshot!

  • Make your changes
  • Once you’re done, commit the changes to the base image. Since libvirt cannot handle external snapshots properly you have to do it by foot. Shut down the VM and go to the directory with the disk images (/var/lib/libvirt/images or such). Then commit the changes to the base image with qemu-img:
# qemu-img commit <filename-of-external-snapshot>

Don’t worry about the destination. It’s in the metadata of the snapshot. Repeat for every disk of the VM and remove the (now very small) snapshot files.

  • Unfortunately libvirt still thinks that there is a snapshot. Delete it with
# snapshot-delete <domain> --metadata <name-of-snapshot>
  • More unfortunately, libvirt still references the snapshot files as base for the virtual disks. So remove them, re-add the real ones and start the VM.

Well, maybe it’s easier with internal snapshots (it should, because the procedure above is quite a dance…), but it works.

Dusting off the Array! (Part 6)

Well, well, well! Here we are again. What shall I say? The plan worked almost as expected. As it turned out it was enough to use the spare HGST 4TB drive and a spare USB 3.0 2TB drive joined in a volume group to copy the remaining data.

The RAID resync was interrupted because a 2nd drive was failing (of course a SEAGATE 3TB). The failing sectors were mostly on the obnam LV, so not a big problem regarding the data, but unfortunately there’s no way to skip that LV or the files, because RAID is at the lowest level and only knows about sectors.

So I completely rebuilt the raid with the 1 remaining free HGST drive and the 3 new ones, everything fly by wire. With 4 working drives the rebuild went ahead with about 33MB/sec, as it should. After 2 days the rebuild and copying the data back was finally done. I lost my obnam backup and a few pics and movies from “movs”, but that’s about it. So I guess one could say that I got away with a slap on the wrist!

In the meantime I’ve had it with the EasyRAID SATA enclosure. There were 2 major drawbacks:

  1. It shuts down when idle, with a timeout too short to survive a reboot. Very nasty!
  2. Even if it’s turned on during POST, sometimes not all drives spun up in time or at all, so it always took several attempts to re-assemble the raid. Dunno if it is because of old age or if it’s a design flaw.

So I looked for another solution and went for an ORINOCO 4Bay USB3.0 and eSATA hard disk docking station. It’s hot-pluggable and has all the bells and whistles. From what I can tell for now, it was a good choice. It has an on/off button, but no timeout, so no more boots without the Array. Yay!

At first it didn’t seem to work at all, but only because I connected the wrong eSATA cable (that one which was dangling free behind hadante). Stupid me! Once I connected the right cable, everything went smoothly.

One more thing: The serial number reported by smartctl is not printed anywhere on the drive label 🙁 Fortunately I found the spare drive on the first attempt! Such things don’t happen often…

And now: This is how it looks like after cleaning up:

Neat, isn’t it? It’s a bit louder without a closed casing, but that’s not necessarily a bad thing ™.

Dusting off the Array! (Part 5)

OK, new plan! After several reboots the array resyncs with about 120 MB/s, but it stops with “recovery interrupted” at about 40%. I have no idea how to fix this, so I’m gonna rebuild the array from scratch.

I ordered 3 new HGST 4 TB drives, hopefully delivered by tomorrow (2017/08/09). The Plan:

  1. Build a striped LVM device over 2 new drives. That should be enough to save all data.
  2. Rsync everything to the LVM device
  3. Replace the failing Seagate drive and rebuild the Array from scratch
  4. Rsync the data back to the RAID array and maybe replace the last remaining Seagate drive


Dusting off the Array! (Part 4)

Well, well, here we are again! Another fight with the rotating drives. If 2TB SSD’s weren’t so expensive (2017/07/30 => ~550 €), I would have replaced all of them by now!

Yesterday (2017/07/29) the oldest drive failed hard, no way to get it working, so I replaced it with a 4GB HGST drive. Should be easy, right? But it isn’t. Had to rip the intestines out:

Had to connect all drives to the internal SATA-Connectors so the board would recognize them. In the external casing it was come and go 🙁

After disabling NCQ by adding libata.force=noncq to the kernel command line I got up to whopping 6000K/sec resync speed! It’s not the kernel. Tried 4.9, 4.11 and 4.12, all the same. The problem is this drive, because it’s failing, too, I guess:

Model Family:     Seagate Barracuda 7200.14 (AF)                                                                     
Device Model:     ST3000DM001-1CH166 
Serial Number:    Z1F58T6T 
LU WWN Device Id: 5 000c50 06725c7df 
Firmware Version: CC27 
User Capacity:    3,000,592,982,016 bytes [3.00 TB] 
Sector Sizes:     512 bytes logical, 4096 bytes physical 
Rotation Rate:    7200 rpm 
Form Factor:      3.5 inches 
Device is:        In smartctl database [for details use: -P show] 
ATA Version is:   ACS-2, ACS-3 T13/2161-D revision 3b 
SATA Version is:  SATA 3.1, 6.0 Gb/s (current: 6.0 Gb/s) 
Local Time is:    Mon Jul 31 01:05:03 2017 CEST 
SMART support is: Available - device has SMART capability. 
SMART support is: Enabled

Of course hadante crashed hard once already, but I do hope that the resync will be done once I’m back from Wacken. About 5 days (7500 minutes) remaining without crash.

Tried to update the drive’s firmware, but that was quite a hassle, too. Had to use chntpwd on othalla to log in and make a bootable USB drive with the latest SeaTools. All for nothing, though 🙁

DBUS Crap

After today’s (2017/06/16) usual pacman -Syu & systemctl reboot the shit hit the fan. SDDM started up fine, but when I tried to login, nothing happened for a while until I got a nice X11-Widget right from the 80’s telling me that something “could not sync environment to dbus”. Yeah, sure! WTF!?

First stop: Google. I’m not the only one. For some reason I can’t just “startkde” any more, but have to use “dbus-launch startkde” in /usr/share/xsessions/plasma.desktop (that’s where SDDM gets the sessions from). Easy enough. KDE loads and seems to work, but it doesn’t really. Any connection attempt to the session bus fails: can’t connect to the ssh-agent even though it’s started, can’t do systemctl –user <something>, pulseaudio doesn’t work and so on… Craptastic!

Maybe it’s some cruft in ~/.config or ~/.session. Move both away, and just to make sure, ~/.cache, too. One swift reboot later it’s work… Fuck, same shit! While skimming through wiki-pages and forum-posts on my mobile, I read the suggestion to try a new user. OK, can’t hurt, can it?

Yes, it kinda can! Of course that works! Well, at least one way out. So, create a new user and port all settings there. Oh what fun! Well, I learned a lot of lessons, like:

  • If you have an USB2 stick plugged in, entering the UEFI-Crap-Thingy what’s now called BIOS doesn’t work (or takes an eternity, maybe I didn’t wait long enough). At least it still boots if you don’t hit DEL or F2
  • The ssh-agent.service for users is hand-crafted (or stolen from somewhere, I don’t remember). You must have $SSH_AUTH_SOCK set in your .bashrc (the latter is sourced by SDDM, BTW) to make it work.
  • Sometimes it ain’t so bad to have Google accounts. After logging in with Chromium, my bookmarks and extensions were back almost immediately.
  • To start a synergy Server, all you have to do is “systemctl –user enable synergys.service”, if you have a working config in /etc/synergys.conf. Starting the client is another beast, though…
  • How to copy and modify the beet database (stored in $HOME/.config/beets/musiclib.blb in my case):
$ ~/.config/beets $ sqlite3 musiclib.blb
SQLite version 3.19.3 2017-06-08 14:26:16 
Enter ".help" for usage hints. 
sqlite> update items set path = replace(path, '<oldhome>', '<newhome>');
  • You don’t have to fire up QtCreator if rdpk starts and exits immediately. If you tell xfreerdp to use pulseaudio and there’s no daemon running, it will do just that…
  • For some reason, letting minidlnad reindex everything is much, much faster than letting it read the database on startup
  • LibreOffice macros are stored in $HOME/.config/libreoffice/4/user/basic/Standard/Module1.xba for now. You can just copy that file to the new $HOME and have fun with it after restarting it

Maybe it was a good thing ™ to get rid of all the baggage, I don’t know… Sure enough, it happened on othalla, too 🙁