Ryzen

After Lausitzring

I ordered a new motherboard, an AMD Ryzen 6-Core CUP with 16 GB DDR-4 RAM and a Macho Rev. 2b Cooler on Thursday, May 18th 2017. Paid by cash in advance, because mindfactory didn’t offer payment by credit card. Anyway, a colleague of mine ordered a gaming computer there before, so prepayment was no problem. The shipment arrived on Saturday, the 20th, when I was at the Lausitzring. Because we left early, I got the package from my neighbor Sunday evening.

Unpacking

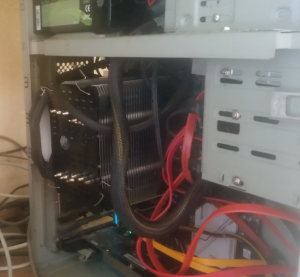
Craptastic. The biggest box in the parcel was the Macho CPU-Cooler! It’s so big that I can’t even close the lid on my casing. Was quite a challenge to assemble. It looks like this:

The heat sink is the big thing in the middle, the turning fan is the white thing to the leftmost. My bedside cabinet was easier to put together!

With the ASUS-AM4-Board you don’t have to remove the backplate. Actually, you can’t. The spacers fit into the threads if you remove the brackets (barely). The heat sink still slides when you fasten the screws, but fortunately it doesn’t really matter.

I benchmarked the whole thing by re-encoding several videos from 1080p to 720p with ffmpeg, threaded. The temp didn’t raise over 65 °C, and it’s blazing fast. My old 6 core did it in real time, now it’s about half the time. At least ffmpeg says so…

Loudness

At first I thought it would be a problem that I couldn’t close the lid, but it isn’t. Actually, the external RAID with 4 hard discs is louder than the CPU fan on full speed. Good thing I orderd the separate cooler. I thought they’d deliver the CPU boxed, with one, but as it turns out, they didn’t.

First Boot

Well, after stuffing everything into the small casing, I pushed the power button and… Nothing! Fortunately I quickly remembered that I forgot to connect the whole Shebang, HDD-Led, power button, speaker and such to the panel. So, disconnect everything (VGA, USB, Network), get it out from under the table and fix it. Next try: One short beep, three long ones, no picture on either display. Shit!

The manual says that it means a missing graphics card. There definitely is one, but maybe in the wrong slot. I now have 3 PCI-Express slots. The first one isn’t usable, because it’s covered by the giant heat sink. So I get under the table and place the NVIDIA-Card into the downmost slot.

That did it! I’m greeted by an UEFI-BIOS and press DEL instantly. Not much to do in there, besides turning on SVM (Virtualization). I managed to get all 3 network cables right the first time, so I have network! The external SATA-casing is no problem, either, instantly recognized. Perfect!

htop shows 12 CPUs, 6 real cores, and 6 Hyperthreading. No fiddling around with UEFI-shit. Grub loads the kernel, as it shoud. Share and enjoy!
Telekom und IPv6 – Total tell, Todd!

Zuvörderst…

… muss man IPv6 Konnektivität herstellen. Wie das geht, habe ich in diesem Artikel beschrieben.

Wenn man aber mehr will…

… wie z. B. ein geroutetes /56er, dann muss man sich weiter anstrengen.

Das geroutete Netz bekommt man nur via DHCPv6. Am einfachsten geht das mit dhcpcd6 und einer dafür gemachten Konfiguration. Davon ausgehend, dass ppp0 das PPPoE-Interface der Telekom ist, muss sie so aussehen:

duid 
noipv6rs 
waitip 6 
ipv6only 
interface ppp0 
ipv6rs 
iaid 1 
ia_pd 1 int
  • iaid ist lediglich ein Identifier, den man referenzieren kann/muss
  • die letzte Zeile “ia_pd 1 int” ist interessant: “int” ist der Name des Netzwerk-Interfaces, dem ein Prefix zugeteilt werden soll.  Standardmäßig bekommt das Teil ein /64-Prefix mit der IP-Adresse Prefix::1/64

ACHTUNG: DHCPv6 läuft über UDP/ipv6, Port 546 ausgehend. Sonst geht gar nix! Hier die Iptables-Regel, wenn die INPUT-Policy Drop heißt:

ip6tables -I INPUT -i ppp0 -p udp -m udp --dport 546 -j ACCEPT

Wenn nix geht, zum Testen die Policies auf “ACCEPT” setzen und dann mit tcpdump schnüffeln.

Wenn man ein Prefix bekommen hat, sollte man…

RADVD installieren…

Und zwar mit folgender Config:

interface int { 
        AdvSendAdvert on; 
        MinRtrAdvInterval 3; 
        MaxRtrAdvInterval 10; 
        prefix ::/64 { 
                AdvOnLink on; 
                AdvAutonomous on; 
                AdvRouterAddr on; 
        }; 
};

“int” ist wiederum das Interface, welches das geroutete Prefix bekommen hat und irgendwie im LAN ist. Wenn an den angeschlossenen Geräten IPv6-Autokonfiguration aktiviert ist, sollten alle glücklich sein 🙂

Nachteile

Mit SLAAC (also Autokonfiguration) und NetworkManager kann zumindest im GUI keine statischen IPv6-Adressen vergeben, da hilft nur IPv4, aber das kriege ich auch noch geregelt 🙂

Hadante Routing

Well, that took quite some doing. Turns out that KabelDeutschland/Vodafone is the least worse provider for VPN-Connections. Routed via Telekom the RDP-Connections are flaky at best.

By default, everything is routed via ppp0/tkom, set up in /etc/ppp/ip-up.d/tkom-up.sh, except for valhalla and the VPN-Server@Work:

/usr/bin/ip rule add to <valhalla>/32 lookup kd
/usr/bin/ip rule add to <work>/32 lookup kd

DO NOT flush all rules, no matter what! This will inevitably lead to “Destination Host Unreachable”, because the rules for looking up main and default are flushed, too. Took me a while to figure out 🙁

To fill the routing table kd, add this to /etc/systemd/network/ext.network:

[DHCP] 
RouteMetric=4096 
RouteTable=199

This adds the routes pushed by DHCP to table 199. RouteTable 199 is defined in /etc/iproute2/rt_tables:

# 
# reserved values 
# 
255     local 
254     main 
253     default 
0       unspec 
# 
# local 
# 
#1      inr.ruhep 
200 tkom 
199 kd

Together with the rules above everything to valhalla and work is now routed via KD.


IPv6 mit der Telekom, Linux und pppoe

Pflicht: IPv4-Konnektivität

Wie das geht, habe ich hier beschrieben. Wenn das nicht läuft, geht auch nichts mit IPv6.

Kür: IPv6-Konnektivität

Ist eigentlich ganz einfach, wenn man weiß, dass Forwarding für das ppp-Interface ausgeschaltet sein muss. Ansonsten kann man lange auf ein Prefix warten: Man bekommt zwar eins, aber das Interface wird nicht konfiguriert!

So geht dem:

Unter Arch Linux gibt es die Datei /etc/ppp/ipv6-up.d/00-iface-config.sh. Dort trägt man Folgendes ein:

#!/bin/bash
echo 1 > /proc/sys/net/ipv6/conf/$1/use_tempaddr 
echo 0 > /proc/sys/net/ipv6/conf/$1/forwarding 
echo 1 > /proc/sys/net/ipv6/conf/$1/autoconf 
echo 1 > /proc/sys/net/ipv6/conf/$1/accept_ra

Wichtig ist die 2. Zeile: forwarding == 0, wie schon oben erwähnt. Diese Option ist der Schlüssel zum Glück, wirklich!

use_tempaddr kann ganz nach Gusto gesetzt werden, und autoconf muss natürlich auch aktiviert sein. Bei accept_ra bin ich mir nicht sicher.

Als Nächstes braucht man rdisc6 (Arch Linux: pacman -S ndisc6). Dann legt man eine neue Datei in /etc/ppp/ip-up.d an (Name egal, Hauptsache, es ist ein ausführbares Shell-Script). Bei mir heißt sie tkom-up.sh:

#!/bin/bash
rdisc6 ${IFNAME}

${IFNAME} wird von dem PPP-Gerümpel gesetzt und enthält den Namen des PPP-Interfaces (Überraschung!).

Zu guter Letzt muss man dem PPP-Dämonen noch sagen, dass er auch für IPv6 zuständig ist. Dafür fügt man die Zeile

+ipv6

irgendwo in /etc/ppp/options hinzu. Nach einem beherzten

# systemctl restart adsl

sollte eine globale IPv6-Adresse an ppp* rangeflanscht sein!

Ansonsten wäre da noch…

systemd-networkd, das standardmäßig Router-Announcements an IPv4-Only-Interfaces entgegennimmt und eine nervige Default-Route via fe80::1 setzt. Das kann man dem Trum abgewöhnen, indem man IPv6AcceptRA=false zu der .network-Unit hinzufügt. Bei mir sieht das so aus (ehemals KD, jetzt Vodafone-Verbimmelung):

[Match] 
Name=ext 
 
[Network] 
DHCP=v4 
IPv6AcceptRA=false


IPv6 connectivity of security.debian.org

The Problem

Have been hunting this down for quite some time now: several virtual hosts weren’t able to connect to security.debian.org. First I thought it was me, even though I had all the ingredients for IPv6-forwarding to work (this is the host):

*filter 
:FORWARD DROP [0:0]
-A FORWARD -p ipv6-icmp -j ACCEPT
-A FORWARD -m conntrack --ctstate RELATED,ESTABLISHED -j ACCEPT

Of course, net.ipv6.conf.*.forwarding was set on the host. That should be enough to forward all outgoing connections and drop incoming, right? And it does, for pretty much any host, except security.debian.org (AKA as lobos.debian.org and villa.debian.org). There may be more, but that one caught my attention, because apt update hung just there (ftp.de.debian.org worked, btw).

First I thought that it was the MTU, but that was pretty much a red herring. After a while I realized that it was working when the FORWARD policy was ACCEPT, but of course that wasn’t a viable solution. So I dug deeper: Strangely enough, with the policy back to DROP and this rule:

-A FORWARD -d <VM-IPv6> -p tcp -m multiport \
   --sports 80,443 -j ACCEPT

it also worked, but this wasn’t enough:

-A FORWARD -s <VM-IPv6> -j ACCEPT

WTF? Fortunately I had a working virtual machine (also debian 8.6, same kernel), so I ended up comparing the IPv6-sysctl values (sysctl -a | grep ipv6).

The solution

As it turned out, the only difference was that the working virtual machine had net.ipv6.conf.*.forwarding enabled. So I added

net.ipv6.conf.all.forwarding=1
net.ipv6.conf.default.forwarding=1

to /etc/sysctl.conf of the failing virtual machine, rebooted and then it finally worked ™! I don’t have the slightest clue why this is necessary, though. The VM is the final receiver, the end of the chain, but certainly not a router! Maybe it’s a kernel bug, I don’t know… I’m just glad it works 🙂

Just calling sysctl -w doesn’t do it, btw. You have to take the interface down and up again to take effect, hence the reboot…

Updating check-mk

It’s actually surprisingly easy! Just download the latest .deb from here to the server. Then install it with:

# dpkg -i <latest.deb>

This by itself does nothing. It just installs the new version in parallel to the old one. All instances must be updated separately with these commands:

# su - <instance_user>
$ omd stop
$ omd update
$ omd start

Now check for new/missing/vanished services and update the agents (it’s not a must, though). Acknowledge all incompatibilities (also not a must) and you’re done!

Printing troubles

In a painful, tedious quest to make my OKI B431dn actually print from a Windows VM I learned several things:

  1. First and foremost: It really, really helps if your printer doesn’t share the IPv4 address with your TV (even if it’s turned off!)
  2. Thinking that you can get the IPv6-stacks on embedded devices such as said printer to work is just wishful thinking
  3. That I (fortunately) didn’t set an admin password for my printer
  4. That my SAMSUNG TV is still online even on standby

To elaborate: My quest started, because I wanted my Windows 10 VM to print. Easy enough, you’d think, but nothing is as easy as it seems 🙁

Adventure Levels:
  1. Fight with cups and Windows and encryption (http vs. https). That was a red herring.
  2. Fight with Samba, shared printers and Windows: another red herring
  3. Fight with different drivers or PPDs
  4. Find out that printing via localhost cups is also painstakingly slow
  5. Eventually figure out that the printer shares the IP with my TV
Solution:
  • Change the IPv4-adress of the printer, turn off IPv6 and only use the (now unique) IPv4-adress.
  • Use the URLs provided by the printer web page
Remarks:

Still don’t know why printing via IPv6 didn’t work as it should, because the printer’s IPv6-address was pretty unique, but what do I know… Anyway, after applying the solution using the generic cups postscript driver and the installed windows postscript driver, printing started after seconds instead of minutes, so problem solved 🙂

Dusting off the Array! (Part 3)

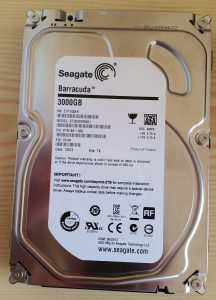
And the story continues… The spare drive I bought on 2016/06/27 was defective as well. As it turned out, it wasn’t even new! The Seagate Warranty Check said: “Out of Warranty” 🙁

Z1F142XH-2

I contacted Amazon and they immediately forwarded my request to the retailer (2016/09/03 4:44pm). Let’s what happens…

I ordered a new drive on 2016/08/27 6:50pm, this time a Hitachi 4TB drive (HGST 0S03665 4TB Deskstar), but I made a mistake: I chose a Packstation as delivery address, even though I don’t have an account (yet), so the parcel was returned to sender (Amazon). At first I couldn’t make sense of the delivery status: Amazon said that the parcel was successfully delivered, but DHL said that it had been returned to sender. A short phone call cleared things up: The drive was indeed returned and I received a credit note (2016/09/02 about 1:40pm).

Later that day I ordered another Hitachi 4TB drive with the same retailer which arrived early next day (2016/09/03 about 9:00am). Unfortunately there wasn’t much time to waste: I had to fail the spare drive hard, because it hung the SATA bus during rebuild:

# mdadm --manage /dev/md1 --fail /dev/sdi

At first I thought that munin -> smartctl -a caused the hangs, but disabling it didn’t help.

While replacing the failed drive I burnt my fingers from the heat, so I set the fan to maximum when I turned Hadante on again. Rebuild is 42% done, still 11 hours to go  as of 2016/09/03 5:25pm. No issues yet, keeping my fingers crossed 🙂

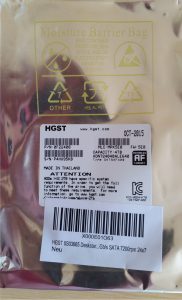
Anyway, this is a photo of the anti-static bag the Hitachi drive came in (SN: P4HU95KB):

P4HU95KB

(Update 2016/09/04 06:56AM): Yeah! The rebuild is done! Hopefully safe again! The obnam LV shut down due to xfs errors, but that’s something I can live with. Maybe it’s the aftermath for force-assembling the array…

Part 1
Part 2
Part 4

Dusting off the Array! (Part 2)

Craptastic^2! Another drive failed as of Thursday morning during backup (2016/08/25). The box hung hard, the SATA bus was completely b0rked, so the process list was filling up with defunct smartctl commands, driving the load towards 100…

OK, no problem, one hard reset later the array was rebuilding. So far, so good, but during the next backup the array failed again, which was kinda expected. In hindsight I should have disabled the job, though. Anyway, Friday morning the box was locked up hard again. Poweroff hung at unmounting the array, no progress at all, so I just turned it off.

Friday afternoon I replaced the failed disk, booted up and was in deep shit! mdadm told me that it cannot start a dirty degraded array. FUCK! There goes my data, I thought… But Google came to rescue!

Fortunately mdadm allows you to force-assemble a dirty, degraded array with:

# mdadm --assemble --force /dev/md1 /dev/sd[ghj] missing

Or so I thought. That command exited with an I/O-Error, because the drives were for busy for some reason.

# cat /sys/block/md1/md/array_state  
inactive

As turned out, inactive is kinda still active. You have to stop the array first to get it working again:

# mdadm -S /dev/md1

Only then it can be force-assembled with the aforementioned command. Once it’s up and running (degraded), add the new disk:

# mdadm --manage --add /dev/md1 /dev/sdi

Now it should be rebuilding. Cross your fingers and pray to whatever god you worship 🙂 Of course the array was shut down Saturday morning, because I still didn’t disable the backup job, but this time it shut down cleanly. One reboot later the rebuild continued…

I guess I was very, very, very lucky: As far as I can tell there was mostly read access up to the 2nd failure (backup). The file systems (all XFS) mounted after recovering from the transaction logs, and the data seems to be OK, but I’ll see…

Lessons learned

  • Always shut down the array cleanly at the first sign of trouble! Don’t wait until the drive fails completely!
  • Don’t think that the failing drive will recover during rebuild. It won’t! It’ll only make things worse.
  • SEAGATE Barracuda drives, esp. ST3000DM001, are, to put it mildly, crap! I didn’t keep track of the history, but I think I replaced each of them at least once. So I ordered a  HGST 0S03665 Deskstar NAS 4TB 6Gb/s SATA as replacement instead of the cheaper (and smaller) SEAGATE drive. Let’s see how that turns out…
  • An inactive array can still be busy, e.g. active and has to be stopped before you can force anything…
  • Keep an up-to-date list of drives, their serials and position in the external SATA casing, so you don’t have to guess which drive failed!

Update (2016/08/27 5:23pm): Fuck SEAGATE! Once again a supposedly new drive almost failed me! At 99.9% rebuild the array shut down and I had to reboot, due to:

Aug 27 16:43:50 hadante kernel: ata5.02: exception Emask 0x100 SAct 0x7fffbfff SErr 0x0 action 0x6 frozen 
Aug 27 16:43:50 hadante kernel: ata5.02: failed command: WRITE FPDMA QUEUED 
Aug 27 16:43:50 hadante kernel: ata5.02: cmd 61/40:00:a0:9b:71/05:00:5c:01:00/40 tag 0 ncq 688128 out 
                                         res 40/00:ff:00:00:00/00:00:00:00:00/40 Emask 0x4 (timeout) 
Aug 27 16:43:50 hadante kernel: ata5.02: status: { DRDY }

After the reboot, the array rebuilt successfully, though. I’ll replace the failing (new) drive with the HITACHI when it arrives, and if that works, I’ll replace all drives, I think…

Part 1
Part 3
Part 4

Dusting off the Array!

Craptastic. Today (2016/06/26) another disc of my archive RAID5 failed (rotating,  SEAGATE ST3000DM001, Serial W1F245R4, out of warranty of course). When I opened the casing, I knew why. The drives were so hot (literally) that I almost burnt my fingers!

Note to Self: Vacuum the thing once in a while. I seriously doubt that any air was flowing at all! Let’s hope that it’ll survive the resync. Only 18 hours to go, Yay!

For the record: Hot-adding a disc to the array:

# mdadm --manage --add /dev/md[x] /dev/sd[y]

Update (2016/06/27 9:15am): I guess I almost lost the array. The rebuild was progressing fine at 93% (about 6:00am) when one of the drives started to make clicking sounds. At first I tried to sit it out, but eventually I shut down the computer and let the drives cool off. That was a very wise decision. 2 and a half hours later the rebuild is continuing with nominal speed and without clicking sounds.

Fortunately, the Linux kernel leaned to continue a RAID rebuild some time ago if it’s shut down cleanly, so it didn’t start from scratch.

Nevertheless, I ordered another spare drive. Seagate discs used to be much more reliable 🙁

Update (2016/06/27 9:50am): Had to shut it down again. One drive started acting up again. After a shower and a shave I fired it up again, this time with the front panel removed, so the air can circulate. Well, only 36 minutes to go, 98.1% done! Tomorrow 2 new drives will be delivered.

Update (2016/06/27 10:45am): Wow, this has to be a very bad joke, and a blessing in disguise. The rebuild didn’t finish, but fortunately the failed drive is the one I just replaced! The array is still there, so I’m crossing my fingers that the remaining discs survive until DHL rings my doorbell tomorrow!

Update (2016/06/29 10:30am): YES! The new drive is good, rebuild is done. Unfortunately failed new drive from the 27th is out of warranty 🙁 Who would have guessed…

Well, well, well… The story continues!

Part 2
Part 3